Page 97 of 113
Re: Caddy R360 build thread
Posted: Tue Mar 12, 2019 12:42 pm
by dan@biali
Thanks
I'd recommend watching a few youtube clips as you can see how its done. Few scrap pieces are also a good idea as its easy to melt the plastic when you're learning. I haven't done it in a while so not a great deal I can remember to help but I did buy myself a hot stapler - much better method for getting the 2 pieces together before welding as it adds some strength, I was just using clamps and self tapping screws in the past which are removed.
One thing you must do is use the correct rods for the type of plastic. Usually on car parts the plastic name is stamped into the back somewhere and you can only join the same plastics to one another.
Re: Caddy R360 build thread
Posted: Tue Mar 12, 2019 3:53 pm
by patman11
Thanks for the explanatory reply! Ordered a stapler and spare bumper. Anything in the pipeline for the R360?
Re: Caddy R360 build thread
Posted: Tue Mar 12, 2019 5:29 pm
by dan@biali
Always got something in the pipeline! Long term stuff though so won't be seen for a long time yet. Main thing is to enjoy it a bit more this year!
Re: Caddy R360 build thread
Posted: Wed Mar 13, 2019 7:42 am
by Baldspeed Racing
one of the best, love all of the details on this so fair play there
Re: Caddy R360 build thread
Posted: Sat Mar 30, 2019 11:41 pm
by Gsi_Jimbo
How have I only just seen this van!! Love it mate

Love all the carbon,
With your heater vents have you just fitted them or did you make/ adapt a duct onto the back?
Sent from my iPhone using Tapatalk
Caddy R360 build thread
Posted: Sun Mar 31, 2019 8:24 am
by dan@biali
Thanks.
There is some info in this thread but it’s buried somewhere!
I did 2 things, one was to build some adapters that connect to the original caddy ducts (I glued them in) and found that a square piece of B&Q small guttering fitted the Audi vent. A lot of measuring and prototyping and I got it all to line up.
The reason they fit so well though is I made my own pods to sculpt the dash to the right shape. Obviously as it was being trimmed I could get away with that method.
I’ll see if I can find what page the details were.
Pages 72 and 80 have some photos.
Caddy R360 build thread
Posted: Mon Apr 01, 2019 7:15 am
by Gsi_Jimbo
Sweet cheers for the info mate, ive only fitted the vents for now, will sort the ducting out in a week or so,
I can see what you’ve done though in my head to get it all connected up,
I got to post 550 odd I think where it shows the vents fitted but I couldn’t see any of the ducting.
Sweet I’ll look at 72-80 cheers for that bro
Sent from my iPhone using Tapatalk
Re: Caddy R360 build thread
Posted: Mon Apr 01, 2019 7:45 am
by Doc
This Post is the one with the adaptors
Re: Caddy R360 build thread
Posted: Fri Apr 05, 2019 11:05 pm
by dan@biali
I've been working on a few little projects recently just tweaking things.
I fitted a trickle charger after the battery went flat. I decided I wanted something that was easy to connect and could be done without opening the bonnet in case it ever went flat again

Saw a nice small charger, the CTEK MX 5.0 that can condition the battery as well as charge. Then when looking for ways to connect it I found the magnetic connectors called magcode on ebay which you can see below. Mine is mounted on the undertray and I can just about get it connected even if its aired out.
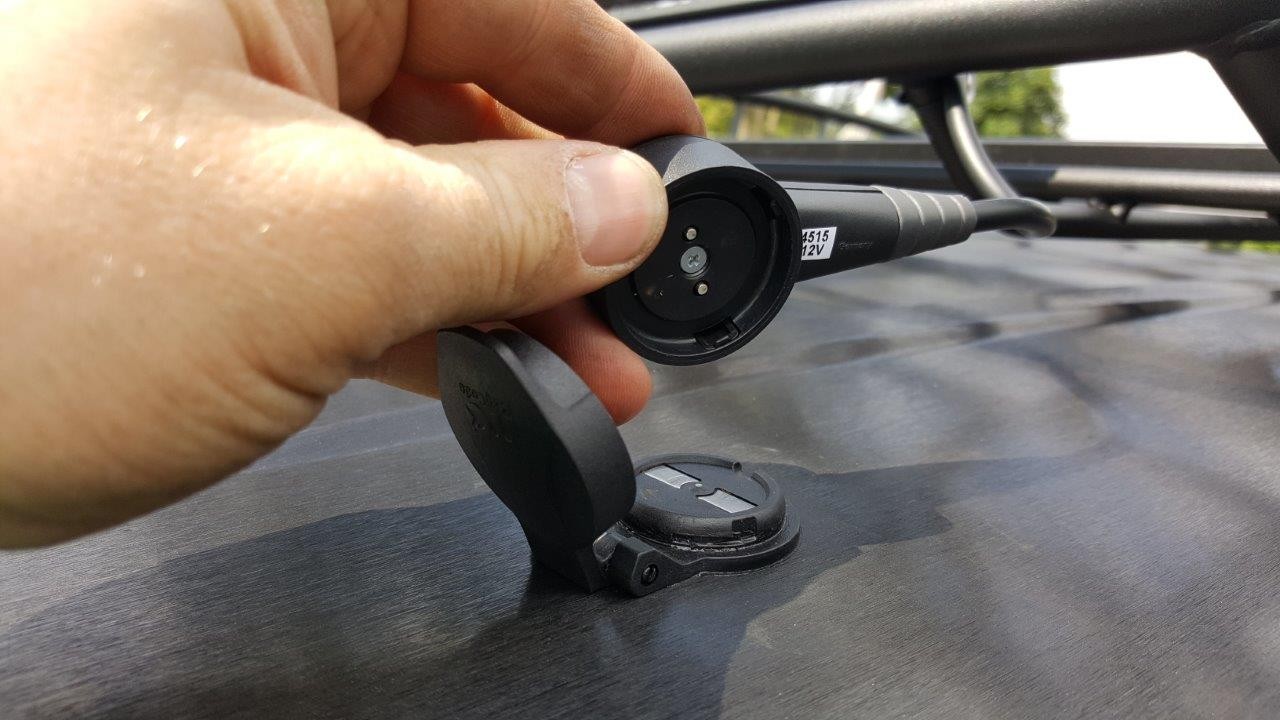
Has a lid and is simple enough to install. Just drill a hole and do up the plastic nut on the back of it. I soldered the connections to it. Then just fit the wires into the terminals in the part that attaches to the charger. As its magnetic, its easy to connect and will pull itself off without damage if you forget before driving off.
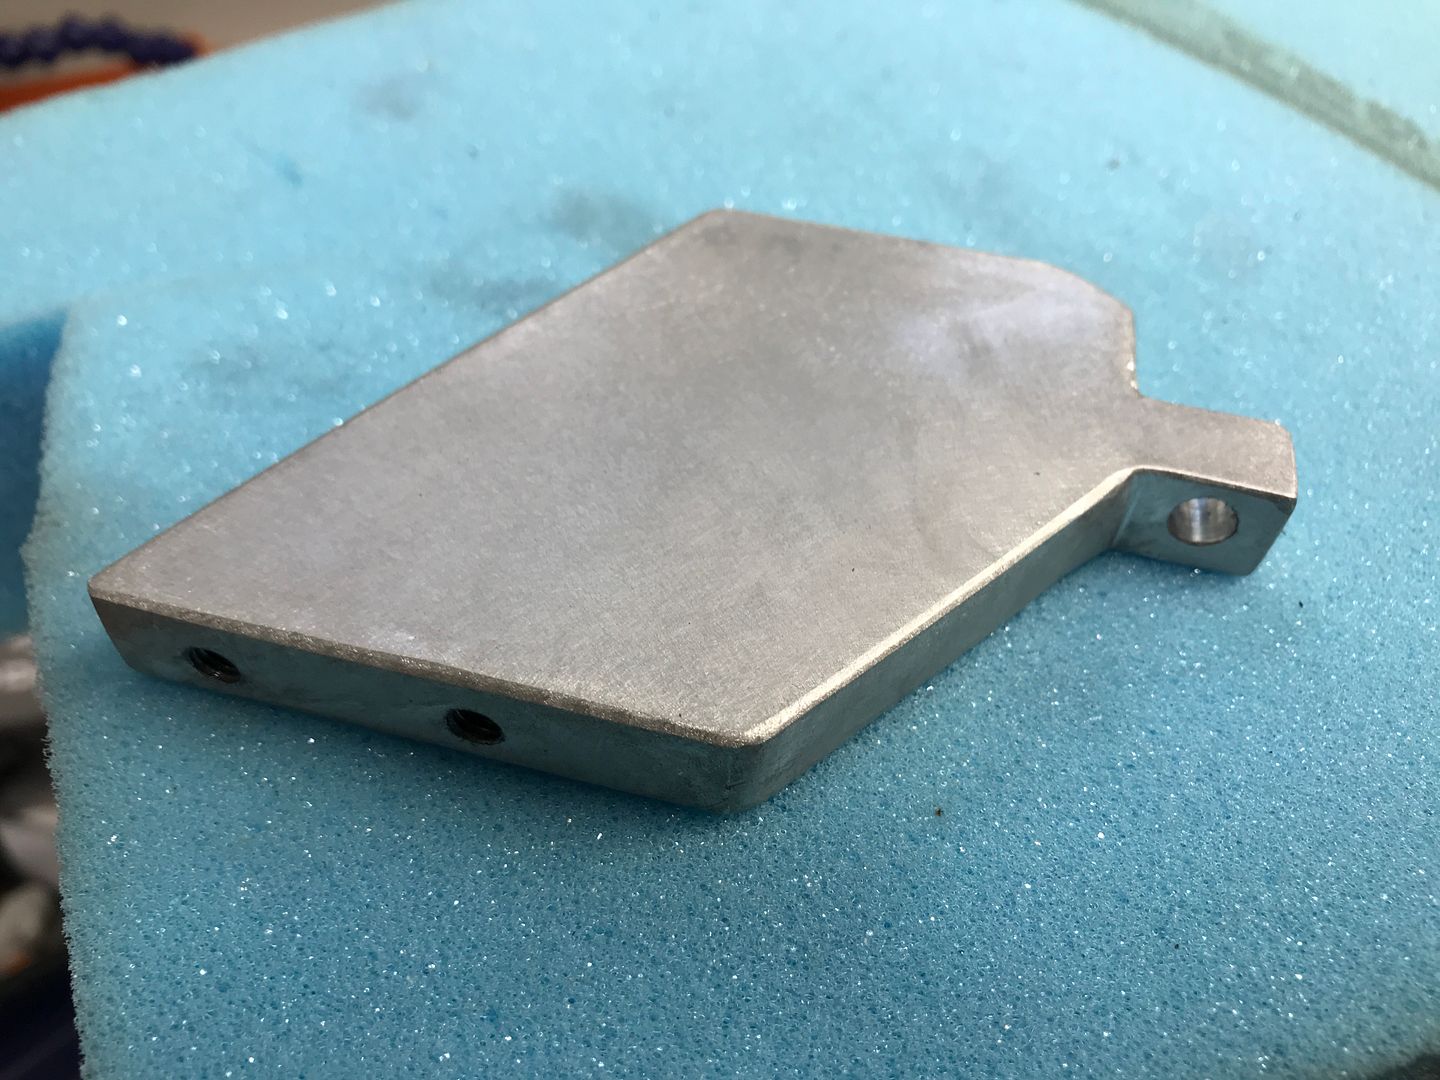
Another thing that needed attention was the catch can drain port. Decided to fit a piece of tubing and have the drain valve somewhere thats easier to access but that meant moving the catch can slightly. Luckily I had some aluminium so made up a bracket from some 12mm flat bar, drilled and tapped some holes and made a different bracket that bolts onto the catch can and attaches to the main bracket. Its big on purpose - there's only 1 mounting point for the bracket so I've made sure it pushes up against the engine mount to stop it moving.


Re: Caddy R360 build thread
Posted: Wed Apr 10, 2019 3:00 pm
by dan@biali
New blue visors in the helmets (clear still in the right one)

Just dropped it off with intermotiv to [finally] get the height sensors fitted as he's developed some brackets to make installing easier - the fronts on the caddy are quite tight and have to be installed accurately.
Re: Caddy R360 build thread
Posted: Tue Jun 18, 2019 11:06 am
by dan@biali
Forgot to write up about the height sensors. I think they've improved the already good ride quality. It definitely feels more taut and controlled. Still chasing an air leak in the system but have no clue where. The air lift manifold has a bit of a reputation for leaking and so its possible thats where mine is. That will be a winter job as I can take it apart and send it back for them to assess it and see if it needs replacing.
Just had some good news, Performance VW want to have the caddy on their stand at Trax Donington Park on the 14th July. I've been to the one at Silverstone before and whilst it can be a bit chavvy, its still an honour I can't really turn down as they only have 10 vehicles on the stand. Plus I'll be at Caffeine and Machine the day before with you lovely lot and a mate has kindly offered to let me stay both nights at his to make the drive more bearable.
Keep an eye out for next months PVW August issue in shops (I think on the 28th June) for the feature they have done on my caddy - for me this is the ultimate achievement, especially as I'm a huge fan and have every copy that I've collected [and have in PVW folders] since day 1.
Re: Caddy R360 build thread
Posted: Tue Jun 18, 2019 11:40 am
by Doc
That's awesome news Dan, congratulations on getting to finally get this van out there.
Donington park is just a few miles from me so expect me to be in close range for most of the day. You need to get it out on track.

The air leaks definitely are a pain on those systems, I know we found one on the rear but I'm assuming you've got some more showing up now?
Re: Caddy R360 build thread
Posted: Tue Jun 18, 2019 11:52 am
by dan@biali
Intermotiv spent ages trying to find any and he couldn't get it to leak on that rear fitting no matter how many things he tried. He gave me a spare fitting so I'll swap it out just for good measure in the future.
Weirdly, I'm getting a drop in pressure from the tanks/manifold as well and again, no matter how much testing, the source cannot be found. I say weird because when I'm driving the compressors never kick in and the pressure doesn't drop, leave it overnight and I'm losing 40psi or more. I plan on replacing the check valves (Intermotiv did replace one) as this can be an area for leaks and its simple enough to do.
No track action yet, get the show side of its life done and dusted and then maybe I'll be fitting lightweight 18" wheels and super sticky toyo 888s..........
Re: Caddy R360 build thread
Posted: Tue Jun 18, 2019 12:10 pm
by Doc
Pah, forget Toyo, you need AR-1s on that when it goes on track.

40psi drop over night from 160psi(?) Is quite significant. I know reusing and continually releasing the PTC fittings for testing etc. isn't a good idea. I've seen a guy use good old fashioned lever valves to isolate circuits and identify a leak source.
The check valves in the compressors don't really stand up to much, a good quality valve between the water separator and the tanks is a good safety measures, a solenoid in there maybe even better.
Re: Caddy R360 build thread
Posted: Tue Jun 18, 2019 1:43 pm
by dan@biali
I started replacing or cutting back the lines (with the proper line cutter tool so they were square) when I reinstalled the brand new 3rd tank and tested the carbon tanks and replaced a couple of fittings as well. The check valves I have are in the lines coming from the compressors (so underneath the 'fuel cell' which I now know how to get out quickly). Maybe I need to map out exactly what I have and look to upgrade or replace wherever is necessary. As I say, definitely a winter task as it will be aired out whilst doing this and I'll be waiting for parts to be supplied.


