Thanks Lister. It is indeed a used working van and yesterday I had a bit of time and some perfect weather to get a little bit of work done on the work van

I know a few people on here may find it interesting so I’ll write a little guide to the various stages of the repair I did.
Before I had the air suspension fitted which incorporates a much more solid trailing arm arrangement, I still had the crappy standard floating axle setup. This meant sometimes depending on the angle of the road the rear wheel stuck out further one side than the other. I must have hit a big compression bump while fully loaded and my passenger side rear tyre rubbed my wheel arch and took a fairly large section of paint off the wheel arch edge. I had touched it in a few weeks ago to temporarily seal it from the elements but wanted to get it fixed permanently before winter arrives.
Sanded and coated with Bilt Hamber Electrox zinc anti corrosion primer which protects the bare metal from any future rust issues.


Then a couple of coats of 2k primer

I only wanted to paint the flat section of the arch rather than the entire quarter panel. I’m 100% comfortable doing this sort of blow in as I do them every day at work so I have a technique which will leave absolutely no masking edge around the arch and no sign that it’s ever been painted. Ready for a few coats of blackberry pearl, then 2 coats of Spies Hecker clear.

Painted and baking at 60c for 30 minutes before being flatted with 2000, then 3000 wet and dry. Then 3 stage polished using Koch Chemie compounds.

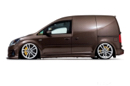
Short video clip of the finished article.
https://youtu.be/ufutZkve5JE
While I had the paint out I also done my new flush fit wiper delete bung.
Primed with etch primer as it’s raw aluminium.


Few coats of base and 2 coats of clear.

Sent from my iPhone using Tapatalk


 very arts and crafts.


 .
.


