Looking forward to seeing how neat you get the install on the CVT, as the e-level+ and CVT is the management I’m planning on going with at winter.
Sent from my iPhone using Tapatalk
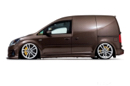
OCD Caddy Demo
-
Lister79
- Hyper Poster
- Posts: 2128
- Joined: Fri Jan 20, 2017 8:38 pm
- Engine size/power: 2.0TSI EA888 Gen3
- Location: Lake District
Re: OCD Caddy Demo
2014 Toffee Brown with EA888 Gen 3 2.0 TSi (CJX) engine (417.5 BHP 545 Nm), Grinds/ABP air suspension and a few other mods 
Build thread:
http://caddy2k.com/forum/viewtopic.php?f=13&t=36629
Build thread:
http://caddy2k.com/forum/viewtopic.php?f=13&t=36629
-
matt@ocd
- Caddy2k Groupie
- Posts: 30
- Joined: Tue Oct 28, 2014 11:02 am
- Engine size/power: 1.0 TSI (100bhp)
Re: OCD Caddy Demo
Thanks lads, really pleased with the progress this past week. Plenty more to come next week that will start to tie it all together a little more 
Looking forward to getting all the interior trims painted and putting them all back. Will really finish things up nicely.
Only thing that will be a little way off finishing is the roof & the panels/trimming in the back. That's all going to have to wait until Carl is back in the shop, our wood work guy.
Then it can be finished properly. Hopefully we'll have any idea of if we're allowed cars shows again then haha
Cool, it certainly is the way to go! Much less wiring to install than ever before and even less than the AirLift options. We love AccuAir at OCD!
If you need any further help, just drop us a message or email when you're ready, be happy to help out.
The ply roof panel arrived yesterday too, so I spent the afternoon drilling & setting rivnuts, to enable me to bolt in all the panels, instead of using the plastic pop rivets that VW use.
So I sized up the roof panel, cut an edge off the cabin roof lining, to allow them to overlap nicely. Then drilled 2 67mm holes to allow the brackets for the ENDO mount to hang through, concealing the support bars I've made. Painted the bars black too, so they don't need removing again now.


I'll mount up the ENDO fully next week when I get all the trims in too, then I can finish the routing of the air lines, wiring etc. Plan my ideas for the roof lining & AccuAir install, ready for finishing that up.
Next big job is the Touran wing mirrors, I need to get these finished so I can mount them up, then finish the interior trims, door cards & audio. Wanting to get the cabin finished up so I can get it back on the road
Stripped the Touran mirrors down, then cut out the 'elbow' of the Caddy mirror from the panel that fills the door gap.


I've made a template for a conversion panel, so I can bolt the Touran mirror to the conversion panel, then the panel to the door. Plastic weld the Caddy panel onto the Touran one so it fills the full gap. Filler & smooth, then paint that. Hopefully by mid next week that will be all done.
Looking forward to getting all the interior trims painted and putting them all back. Will really finish things up nicely.
Only thing that will be a little way off finishing is the roof & the panels/trimming in the back. That's all going to have to wait until Carl is back in the shop, our wood work guy.
Then it can be finished properly. Hopefully we'll have any idea of if we're allowed cars shows again then haha
Cool, it certainly is the way to go! Much less wiring to install than ever before and even less than the AirLift options. We love AccuAir at OCD!
If you need any further help, just drop us a message or email when you're ready, be happy to help out.
The ply roof panel arrived yesterday too, so I spent the afternoon drilling & setting rivnuts, to enable me to bolt in all the panels, instead of using the plastic pop rivets that VW use.
So I sized up the roof panel, cut an edge off the cabin roof lining, to allow them to overlap nicely. Then drilled 2 67mm holes to allow the brackets for the ENDO mount to hang through, concealing the support bars I've made. Painted the bars black too, so they don't need removing again now.
I'll mount up the ENDO fully next week when I get all the trims in too, then I can finish the routing of the air lines, wiring etc. Plan my ideas for the roof lining & AccuAir install, ready for finishing that up.
Next big job is the Touran wing mirrors, I need to get these finished so I can mount them up, then finish the interior trims, door cards & audio. Wanting to get the cabin finished up so I can get it back on the road
Stripped the Touran mirrors down, then cut out the 'elbow' of the Caddy mirror from the panel that fills the door gap.
I've made a template for a conversion panel, so I can bolt the Touran mirror to the conversion panel, then the panel to the door. Plastic weld the Caddy panel onto the Touran one so it fills the full gap. Filler & smooth, then paint that. Hopefully by mid next week that will be all done.
-
matt@ocd
- Caddy2k Groupie
- Posts: 30
- Joined: Tue Oct 28, 2014 11:02 am
- Engine size/power: 1.0 TSI (100bhp)
Re: OCD Caddy Demo
Steady week carrying on with the Caddy build, starting to slow down a little waiting on parts or supplies needed. But the front carpets, Touran bases & 6 speed gearbox landed Monday, so that let me get on with getting the dash & interior back together.
I also took all the interior plastics & painted them dark grey using a bumper paint. A close a match as possible to the OE trims & dash, whilst also being hard wearing, it won't just tarnish & flake as soon as I start dailying the van.


Carpets, seat bases & trims all installed


Wired in the Alpine head unit, GPS, DAB & Bluetooth mic all routed & mounted. I also Tee'd the speaker wiring, so it all runs through the Alpine amp in the back footwell. Tested it out and I'm real happy with the results Will get some more info up once I have it all setup too.

I also removed the faded front bumper lower grilles, painting these in the black bumper paint. Look much better and will stay black, no need for trim restore products every wash!

So with the interior trims going in, it was time to mount up the ENDO tank fully, route the wiring & lines, make sure everything is sitting how I'd like it to.
All went pretty well and I love the look of the tank hanging.


The ply floor arrived too, so dropped that in place to see how it lines up. I'm wanting to make some nice tie down mounts, instead of the plain OE ones, so I'll start thinking about that next week.

Just got to finish up the wing mirrors now. I've drawn up a conversion bracket, which is being plasma cut by the guy who does all our fabrication work. Will get that from him this coming week and finalise mounting the wing mirrors, then I will plastic weld & smooth the outer caps, before painting in the same black the front grilles are done in.
So with the interior just waiting on the mirrors now, I started sorting out the rear brakes. The NSR was seized, handbrake cable was rusty inside & not working well, but the caliper mechanism had also seized up. So I stripped all the brakes down and started stripping the calipers ready for paint & a new seal kit.
Whilst the brakes were stripped, I also pulled out the rear arch liners & cleaned those up. Then scuffed back the metal & coated in underseal.
I'm also going to spray the inner arches with Lizard Skin, a product we came across at SEMA last year. It's a spray on sound insulation, they also do a spray on heat insulation too, but I'm just doing the sound to try and remove as much echo road noise as possible from the van.
Will also do the rear floor before putting the wood down and fixing that.
This is the Lizard Skin if you're interested in looking - www.lizardskin.com


Thanks again for reading guys, looking forward to tying this build up more next week before getting it back on the road.
I also took all the interior plastics & painted them dark grey using a bumper paint. A close a match as possible to the OE trims & dash, whilst also being hard wearing, it won't just tarnish & flake as soon as I start dailying the van.
Carpets, seat bases & trims all installed
Wired in the Alpine head unit, GPS, DAB & Bluetooth mic all routed & mounted. I also Tee'd the speaker wiring, so it all runs through the Alpine amp in the back footwell. Tested it out and I'm real happy with the results
I also removed the faded front bumper lower grilles, painting these in the black bumper paint. Look much better and will stay black, no need for trim restore products every wash!
So with the interior trims going in, it was time to mount up the ENDO tank fully, route the wiring & lines, make sure everything is sitting how I'd like it to.
All went pretty well and I love the look of the tank hanging.
The ply floor arrived too, so dropped that in place to see how it lines up. I'm wanting to make some nice tie down mounts, instead of the plain OE ones, so I'll start thinking about that next week.
Just got to finish up the wing mirrors now. I've drawn up a conversion bracket, which is being plasma cut by the guy who does all our fabrication work. Will get that from him this coming week and finalise mounting the wing mirrors, then I will plastic weld & smooth the outer caps, before painting in the same black the front grilles are done in.
So with the interior just waiting on the mirrors now, I started sorting out the rear brakes. The NSR was seized, handbrake cable was rusty inside & not working well, but the caliper mechanism had also seized up. So I stripped all the brakes down and started stripping the calipers ready for paint & a new seal kit.
Whilst the brakes were stripped, I also pulled out the rear arch liners & cleaned those up. Then scuffed back the metal & coated in underseal.
I'm also going to spray the inner arches with Lizard Skin, a product we came across at SEMA last year. It's a spray on sound insulation, they also do a spray on heat insulation too, but I'm just doing the sound to try and remove as much echo road noise as possible from the van.
Will also do the rear floor before putting the wood down and fixing that.
This is the Lizard Skin if you're interested in looking - www.lizardskin.com
Thanks again for reading guys, looking forward to tying this build up more next week before getting it back on the road.
-
Baggie131183

- Caddy2k Groupie
- Posts: 20
- Joined: Thu Mar 19, 2020 12:36 am
- Location: Tamworth
Re: OCD Caddy Demo
Looking awesome Matt ! You're not hanging about with getting it sorted
Adam.
Adam.
-
Matias

- 100BHP+
- Posts: 136
- Joined: Sun Apr 05, 2020 4:18 pm
- Engine size/power: 2.0 TDI (140bhp)
- Location: CZ
-
matt@ocd
- Caddy2k Groupie
- Posts: 30
- Joined: Tue Oct 28, 2014 11:02 am
- Engine size/power: 1.0 TSI (100bhp)
Re: OCD Caddy Demo
Cheers Adam. The lockdown has come at a good time for us haha
We'd planned in the diary allowing time to sort things out we normally don't have time for, I didn't expect this much time, but I'll take it
We'd planned in the diary allowing time to sort things out we normally don't have time for, I didn't expect this much time, but I'll take it
-
matt@ocd
- Caddy2k Groupie
- Posts: 30
- Joined: Tue Oct 28, 2014 11:02 am
- Engine size/power: 1.0 TSI (100bhp)
Re: OCD Caddy Demo
Well, been a bit quieter on the Caddy. Mixture of waiting for parts & being very busy with website orders. Also made a start on my 1975 Chevrolet C10 build too. Not found the time to upload the photos and sort them out, here comes a big dump! 
To carry on from the last post, I painted up the seatbelt trims for the B-pillars & also added some new pedal covers to clean things up.


The faux suede finally came in too after struggling to find someone open with decent fabric. So I trimmed up the roof lining & parcel, also carpeted the inside of the shelf too. The roof lining was a pain as the fabric has no stretch, but the shelf wasn't too bad and hides the bits that weren't so good on the roof lining. Pretty happy with it though, in place it looks good & really makes the cab much smarter.


Previous owners had made a mess off the screws used in the interior light & sunvisor mounts too, so I've only been able to get the drivers in for now. The interior light switch is also buggered, so going to swap that for new. Probably do the W8 version as that seems a nice swap.
To finish off the cab, I managed to pick up a set of GTD seats in good condition. Got the back bench too, stripped that down to save the fabric for spare.
Also made a tarten shift boot too, which looks that part


Real happy with how it's all come out inside, just the rear to finish up & we're all done
My last main job was the rear calipers, they'd both seized. So I got some recon units, shot blast the carriers & painted them both up. I used a paint from the US called Steel-It. It contains stainless steel particles & is designed as an alternative to powdercoat. Takes a week to set fully, but has incredible adhesion & rust preventive properties. You can also weld straight through it without grinding back if needed. It's a pretty sweet shade of grey too so using it for a few bits on the Caddy.
The old brake lines on the calipers were knackered too, so they've been made new too, with new boots & seals etc.


I'm also adding a little extra sound deadening too to really quieten everything down. So I applied Lizard Skin to the rear wheel arches, before putting the plastic liners back in. I'm also going to do the bed floor too, before putting a ply floor down to finish it.


This is a great product if you're restoring a classic or sound deadening a van. So easy to spray on, dries jet black & can be painted over or just carpet etc.
It again is a rust preventative keeping moisture out. Best of all, being sprayed on you can get it everywhere, places you'd never get with traditional roll on mat sound deadening. I also like that it looks more like OE underseal too so if you are doing a resto it looks right too.

That is the main chunk of work about done on the van. Just the brakes to bleed now & handbrake cable to set then cup holder back in the armrest.
I'm waiting on some conversion plates to finish up the wing mirrors, so I'll be back with the updates on that.
We've made a good start on the new 4 Link air suspension rear setup, really looking forward to progressing that and having it ready in summer.
Thanks again guys!
To carry on from the last post, I painted up the seatbelt trims for the B-pillars & also added some new pedal covers to clean things up.
The faux suede finally came in too after struggling to find someone open with decent fabric. So I trimmed up the roof lining & parcel, also carpeted the inside of the shelf too. The roof lining was a pain as the fabric has no stretch, but the shelf wasn't too bad and hides the bits that weren't so good on the roof lining. Pretty happy with it though, in place it looks good & really makes the cab much smarter.
Previous owners had made a mess off the screws used in the interior light & sunvisor mounts too, so I've only been able to get the drivers in for now. The interior light switch is also buggered, so going to swap that for new. Probably do the W8 version as that seems a nice swap.
To finish off the cab, I managed to pick up a set of GTD seats in good condition. Got the back bench too, stripped that down to save the fabric for spare.
Also made a tarten shift boot too, which looks that part
Real happy with how it's all come out inside, just the rear to finish up & we're all done
My last main job was the rear calipers, they'd both seized. So I got some recon units, shot blast the carriers & painted them both up. I used a paint from the US called Steel-It. It contains stainless steel particles & is designed as an alternative to powdercoat. Takes a week to set fully, but has incredible adhesion & rust preventive properties. You can also weld straight through it without grinding back if needed. It's a pretty sweet shade of grey too so using it for a few bits on the Caddy.
The old brake lines on the calipers were knackered too, so they've been made new too, with new boots & seals etc.
I'm also adding a little extra sound deadening too to really quieten everything down. So I applied Lizard Skin to the rear wheel arches, before putting the plastic liners back in. I'm also going to do the bed floor too, before putting a ply floor down to finish it.
This is a great product if you're restoring a classic or sound deadening a van. So easy to spray on, dries jet black & can be painted over or just carpet etc.
It again is a rust preventative keeping moisture out. Best of all, being sprayed on you can get it everywhere, places you'd never get with traditional roll on mat sound deadening. I also like that it looks more like OE underseal too so if you are doing a resto it looks right too.
That is the main chunk of work about done on the van. Just the brakes to bleed now & handbrake cable to set then cup holder back in the armrest.
I'm waiting on some conversion plates to finish up the wing mirrors, so I'll be back with the updates on that.
We've made a good start on the new 4 Link air suspension rear setup, really looking forward to progressing that and having it ready in summer.
Thanks again guys!
-
Doc

- Not God, just a bellend
- Posts: 18488
- Joined: Thu Jan 01, 1970 1:00 am
- Engine size/power: 2.0TSI EA888 Gen3
- Location: Monaghan, Ireland & Derbyshire, UK
Re: OCD Caddy Demo
Great work, caddy if coming together lovely now.
Be nice to see this out and about.
Be nice to see this out and about.


2013 Caddy with EA888 Gen3 2.0TSI DSG, Superplus MSP19 , Caddy4 rear lights, Polo GTI (mk7 style) steering wheel, Relentless Tuning front coilovers, Audi A6 S-Line front seats, Boxster fronts & GTI rear Brakes, 3D Colour Premium dash cluster, Caddy life arm rest, Motexion bulkhead, MIB head unit
All posts written by me are the intellectual property of the caddy2K forum and I do not consent to copying or redistribution of any sort
-
Baggie131183
- Caddy2k Groupie
- Posts: 20
- Joined: Thu Mar 19, 2020 12:36 am
- Location: Tamworth
Re: OCD Caddy Demo
Looks mega Matt !! Seats look good in there ! I think that’s what I’m eventually going to fit in mine.
Sent from my iPhone using Tapatalk
Sent from my iPhone using Tapatalk
-
belv
- Caddy2k Groupie
- Posts: 45
- Joined: Mon Feb 24, 2020 11:11 am
- Engine size/power: 1.9 TDI (104bhp)
Re: OCD Caddy Demo
That'll look great and has been done quick. Hadn't thought of sound proofing the underside of the arches. Would have been better.